Data Pipelines with n8n and MarkLogic
Part 1 - Data Ingestion
The ability to efficiently ingest, manage and intelligently query large volumes of information is critical for businesses seeking to derive actionable insights from their cross-functional, multi-modal data. The relatively recent advances in AI, particularly in the form of Large Language Models (LLM), now make it as critical to be able to rapidly apply AI to tha analysis of proprietary, corporate information in a secure and private environment, as opposed to uploading data to an AI-company's cloud.
In a series of blog posts, we will be exploring how to use n8n, MarkLogic, LLMs, vector search, RAG and semantic augmentation to leverage the power of AI technologies to reveal knowledge trapped in corporate data repositories.
Core Technologies
Let us first review the technologies we will be leveraging.
n8n
n8n is a powerful open-source pipeline automation tool that allows users to create complex data pipelines with ease, using a low-code, drag-and-drop visual workflow editor. n8n comes with extensive pre-built and custom integrations that allow you to define pipelines that can incorporate applications such as MarkLogic, Semaphore, Google apps, LLMs and hundreds of others.
MarkLogic
Progress MarkLogic is a secure, scalable, multi-modal NoSQL database platform designed for handling structured, unstructured, semantic, geospatial and vector data, while offering advanced search capabilities, the highest levels of security and scalability to provide highly efficient data management.
LLMs
Large Language Models (LLM) are Artificial Intelligence apps capable of generating expert, human-like, natural language responses to text-, image- or video-based queries. These models are trained on huge volumes of data (mostly derived from the internet), but as such they are only aware of the data they were trained on. To overcome this limitation RAG has evolved as a technique to inject local (often proprietary) information into the LLM reasoning process.
RAG
Retrieval-Augmented Generation, RAG, is a technique for applying LLMs to private data without having to share the data with LLM providers (e.g., OpenAI, Google) or retrain a local LLM on that data. More details on this approach will be covered in a forthcoming blog.
Vector Search
Vector databases store vector representations of text/image/video as high-dimensional vectors that can be used to determine their semantical similarity - the closer two vectors are, usually using a measure such as cosine similarity, the more semantically similar the documents they represent are likely to be. Vector search uses a vector database (such as MarkLogic) to retrieve documents semantically similar to a query. The major advantage of this approach is that it often provides more accurate retrieval of relevant documents than simple, word-based queries alone.
Semaphore
Progress Semaphore is a metadata management platform that can add a semantic layer to your data. It provides proven value in improving RAG results, in some cases to levels close to 99% retrieval accuracy. We will explore how this is done in a subsequent blog.
Getting Started: n8n and MarkLogic
In Part 1 of this series of articles, we will focus on using n8n to orchestrate the automated ingestion of plain text Llamaverse Documents into MarkLogic. In subsequent parts of this series, we will see how to use n8n to ingest pdf documents and how to query MarkLogic to provide the basis for a RAG solution with very little coding.
Setting Up and Running n8n
n8n can be installed as a local app on macOs, linux and windows, or it can be installed in a docker container. While there are several advantages to running n8n in a container (e.g., portability, isolation, scalability, etc.), we will assume n8n is installed locally to simplify the monitoring of the local file system, which the workflow will be watching for file additions.
Follow these instructions to install n8n locally. Once that is done, execute the following on the command line:
npm install -g n8n
Running n8n
The ingestion workflow we are going to create will be "watching" a specific folder for files to ingest into MarkLogic, so you will need to run n8n from a folder (let's call it n8n) where you can create a watch sub-directory into which you can drop the ingestion documents.
.
└── n8n
    └── watch
To run n8n, cd into the n8n folder and run n8n from the command line.
Next, point your web browser at the n8n UI: http://127.0.0.1:5678
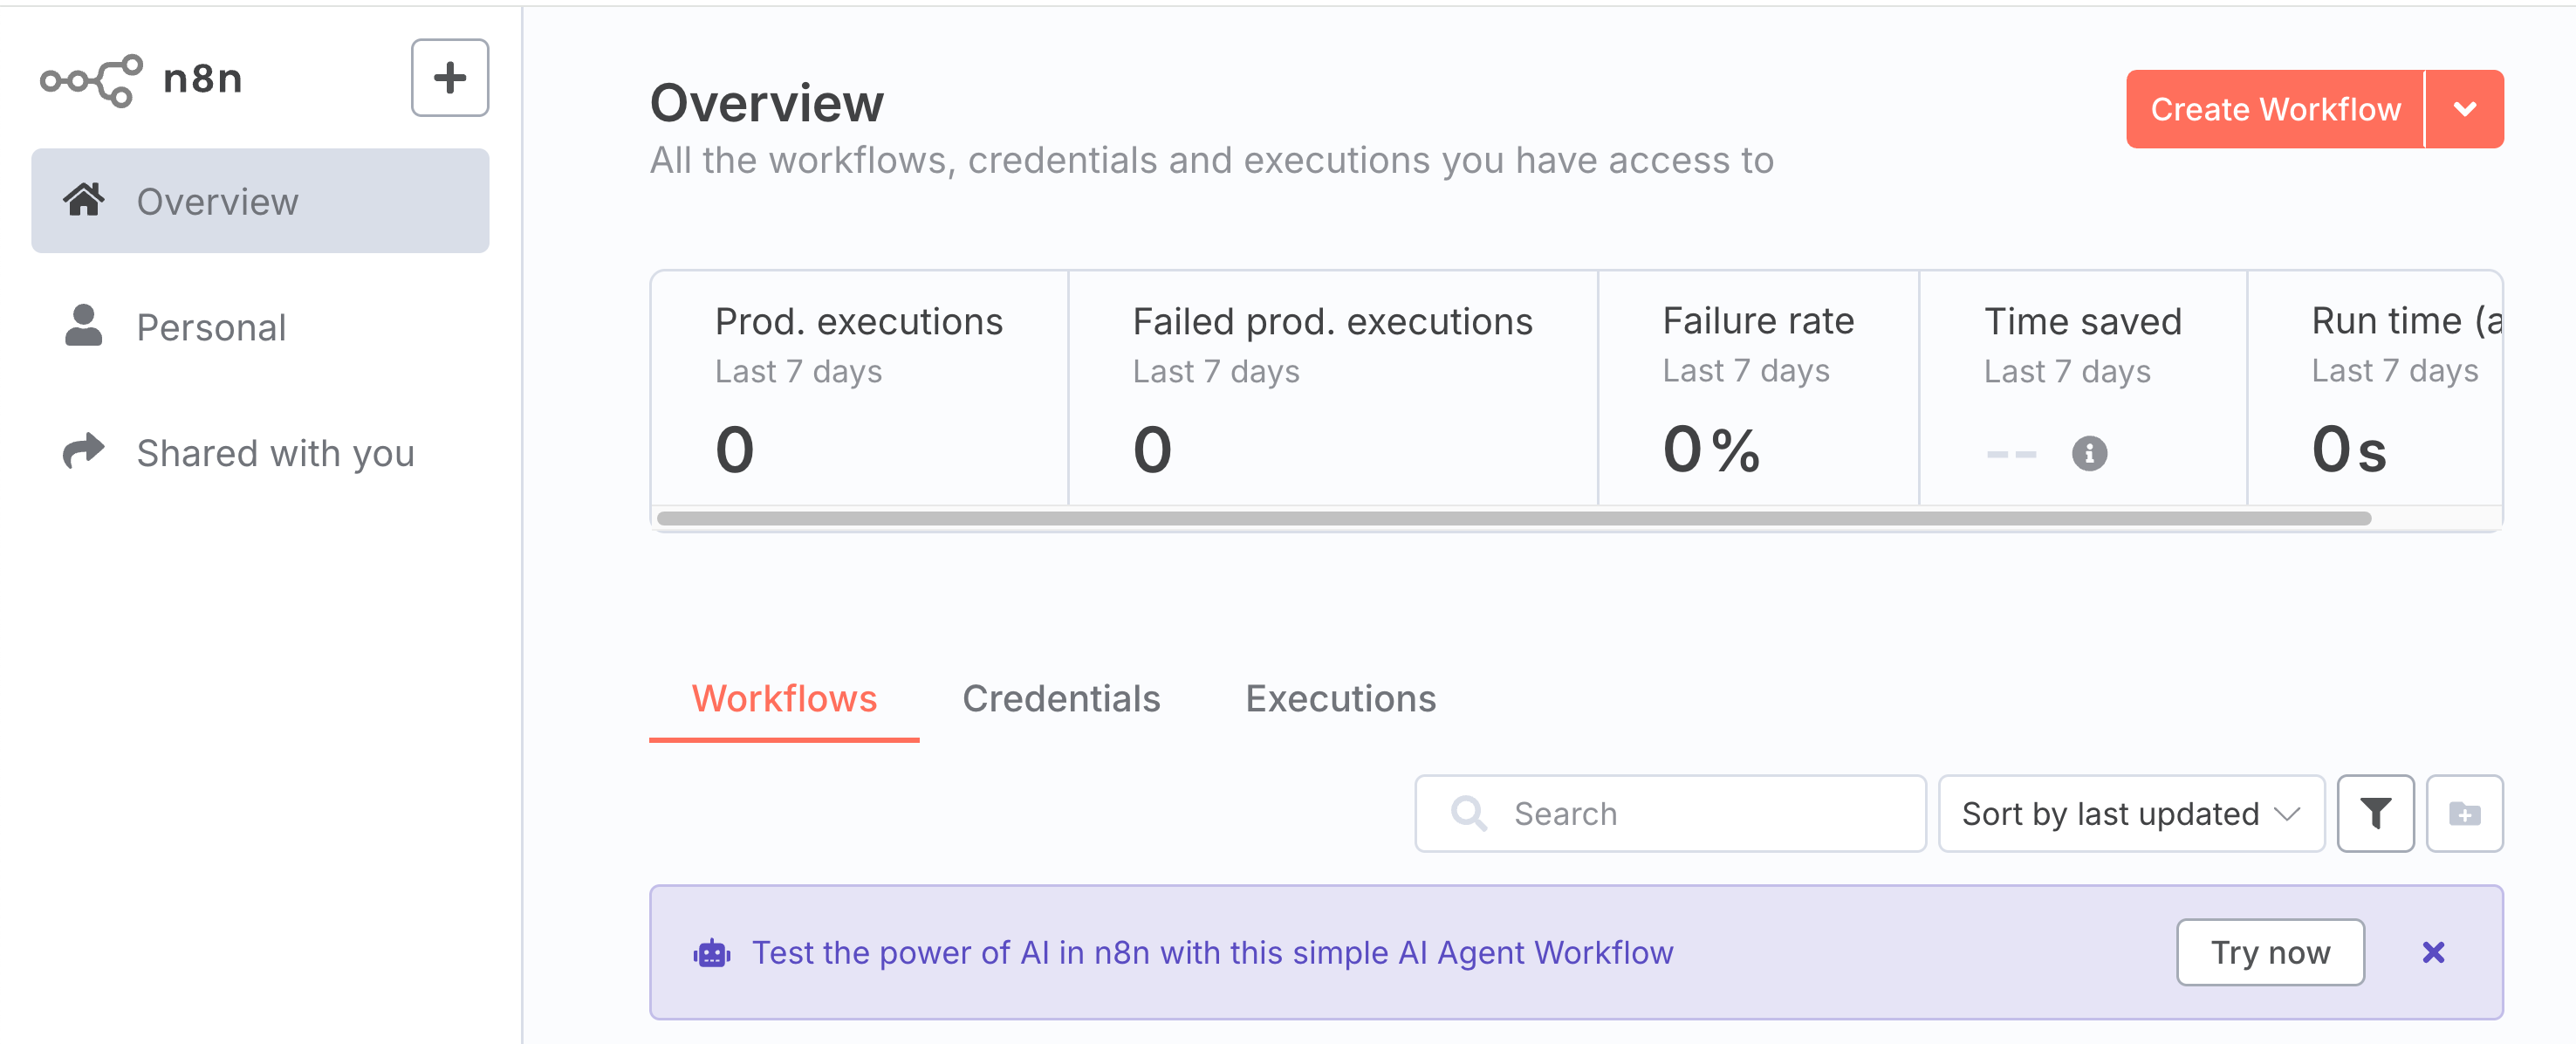
You will then be required to set up a local account and click through a few screens. After that, you should a page similiar to below:
Setting Up MarkLogic
If you don't already have MarkLogic installed on your machine, you can download and install MarkLogic 11 or create a MarkLogic 11 docker container using instructions provided here. After the install, MarkLogic should be up and running. We will wll be using http://localhost:8000 as a MarkLogic HTTP endpoint, so go ahead and verify you can get to it using a web browser; this will take you to the the MarkLogic Query Console.
Creating an Ingestion Workflow
We're going to create an n8n workflow to ingest llamaverse documents dropped into the "watch" folder.
The Data
For this blog we'll be using the Teresa llama document from the Llamaverse. You can also dowload it directly here
This document contains the following json:
{
  "id": "81b4631f-0ddb-45dd-aa6f-4cf3ac09b259",
  "name": "Teresa",
  "heightCm": 169,
  "weightKg": 182,
  "eyeColor": "Amber",
  "hairColor": "Brown",
  "breed": "Huacaya",
  "placeOfBirth": "Quito, Ecuador",
  "interests": [
    "baking",
    "birdwatching",
    "meditation"
  ],
  "medicalCondition": {
    "name": "hypertension",
    "id": "298c2e45-9356-4a87-9a34-34fefe5e9c83"
  },
  "relatedTo": {
    "id": "2308d164-b3e2-4244-9e0c-fdd556a2b875",
    "relationship": "sister"
  },
  "description": "Teresa is a amber-eyed llama with brown hair, standing 169 cm tall. Originally from Quito, Ecuador, Teresa enjoys baking, birdwatching, and meditation. Known for their curious and calm personality, Teresa is a gentle soul among llamas.",
  "secretPower": {
    "name": "Camel Whisperer",
    "id": "01b3e8c0-3d5f-4f83-b672-97dfbe5ae40b"
  }
}
Creating the Workflow
In your web browser (we're using Chrome), navigate to the n8n UI at http://127.0.0.1:5678.
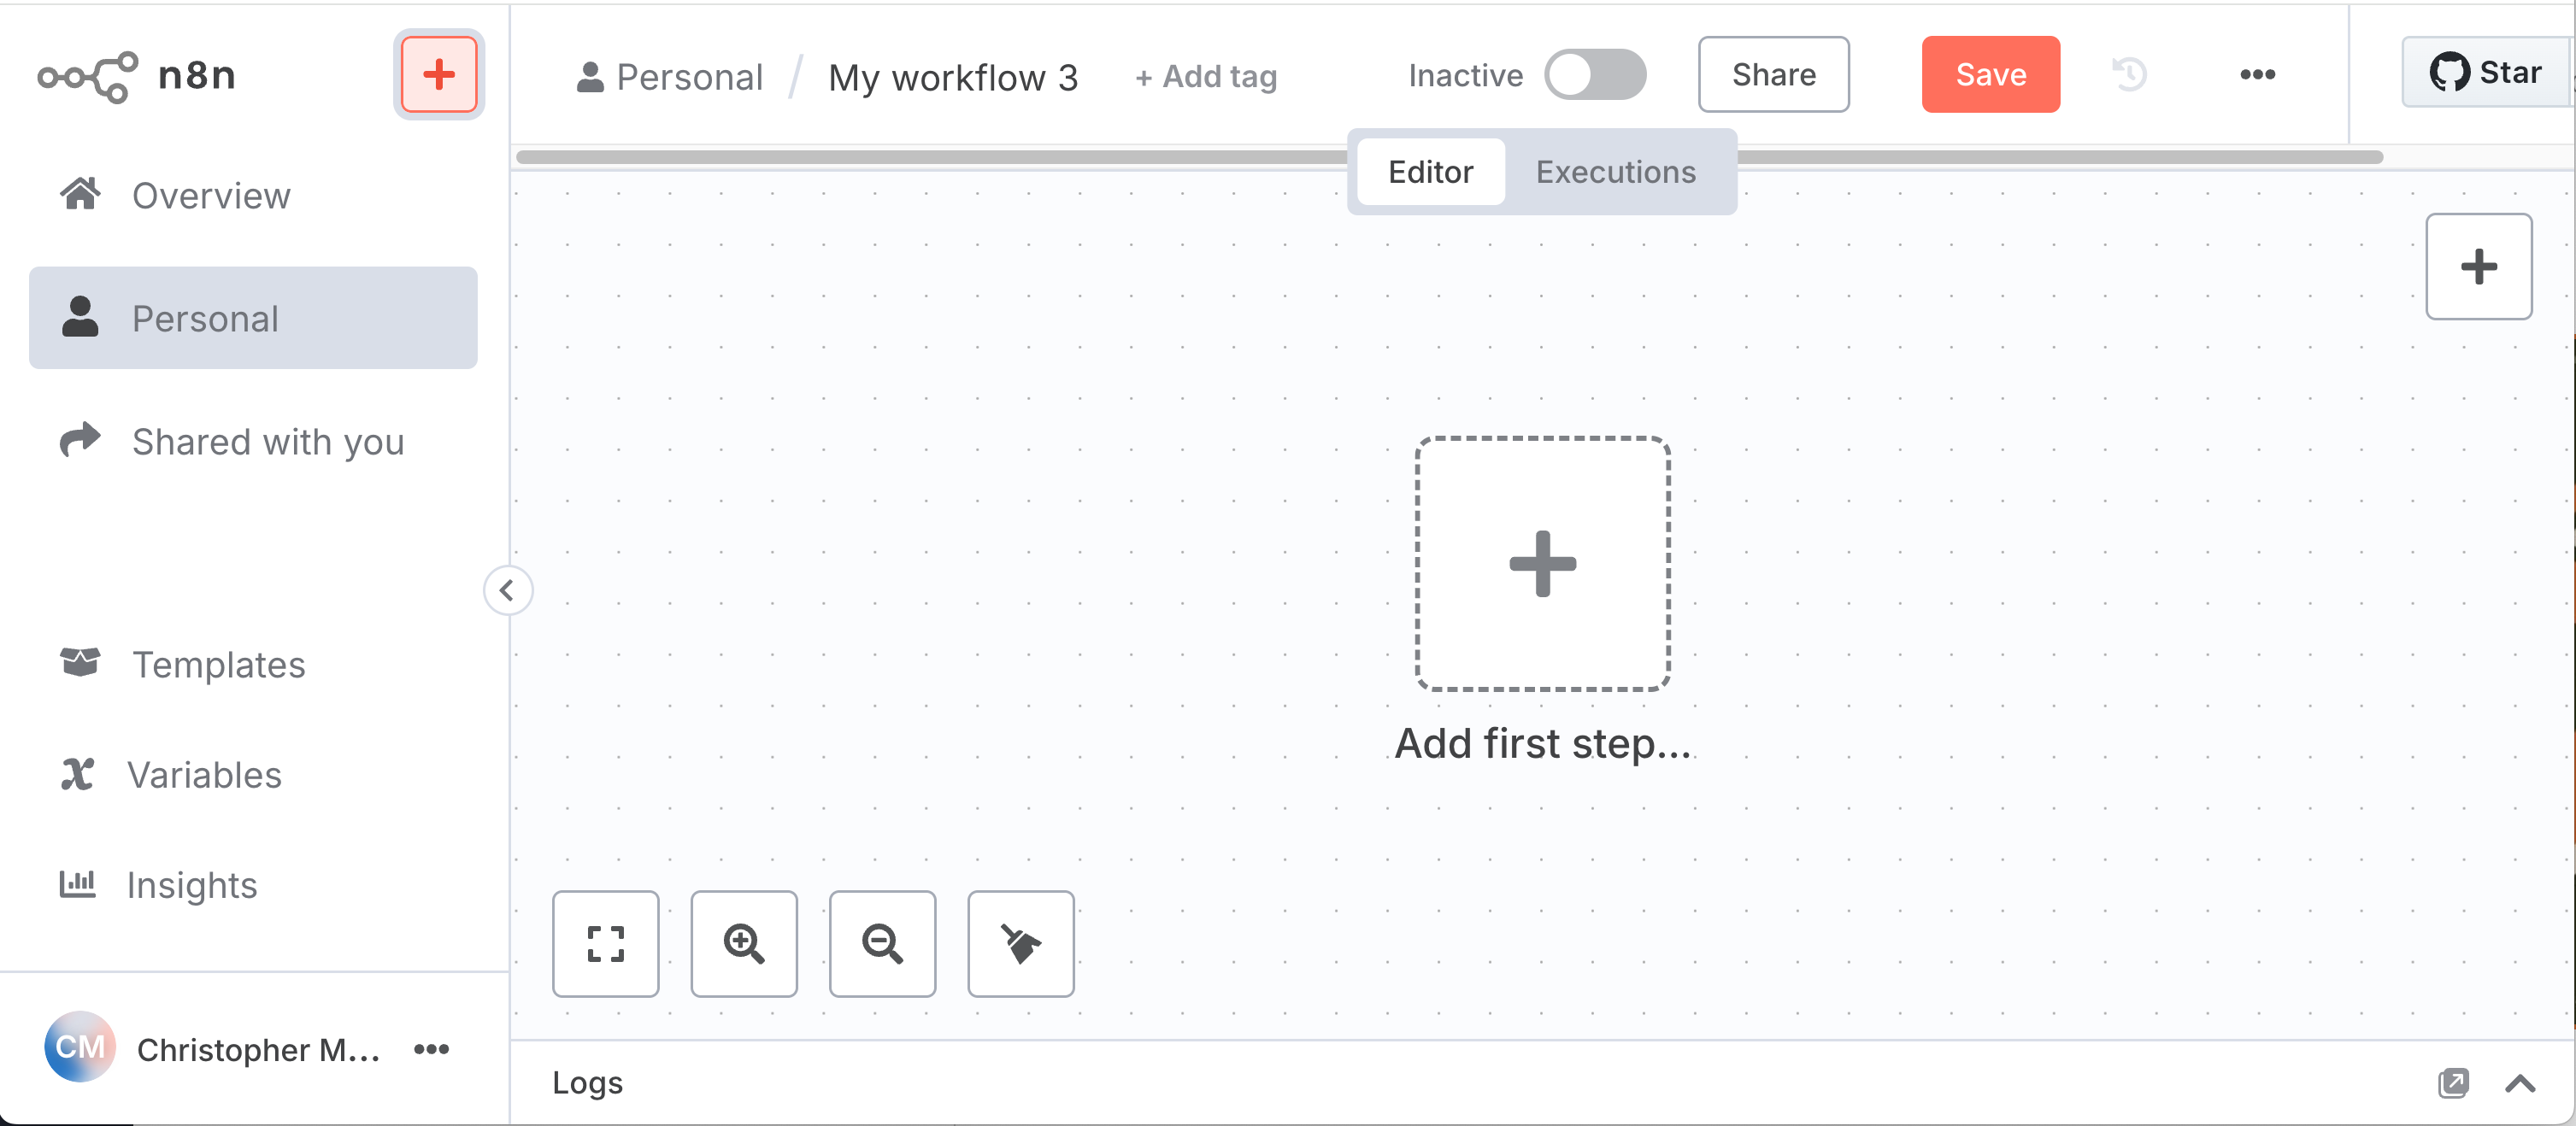
Locate the + icon next to the n8n logo in the upper left hand corner. Click on it and select "Workflow" from the menu that appears to create an empty workflow. You should see something like this:
Local File Trigger Node
Now click on the + labeled "Add first step". Enter "Local File" in the query box on the right hand side and click on the item labeled "Local File" and then select "On changes involving a specific folder". You should now see this "node" in your workflow:
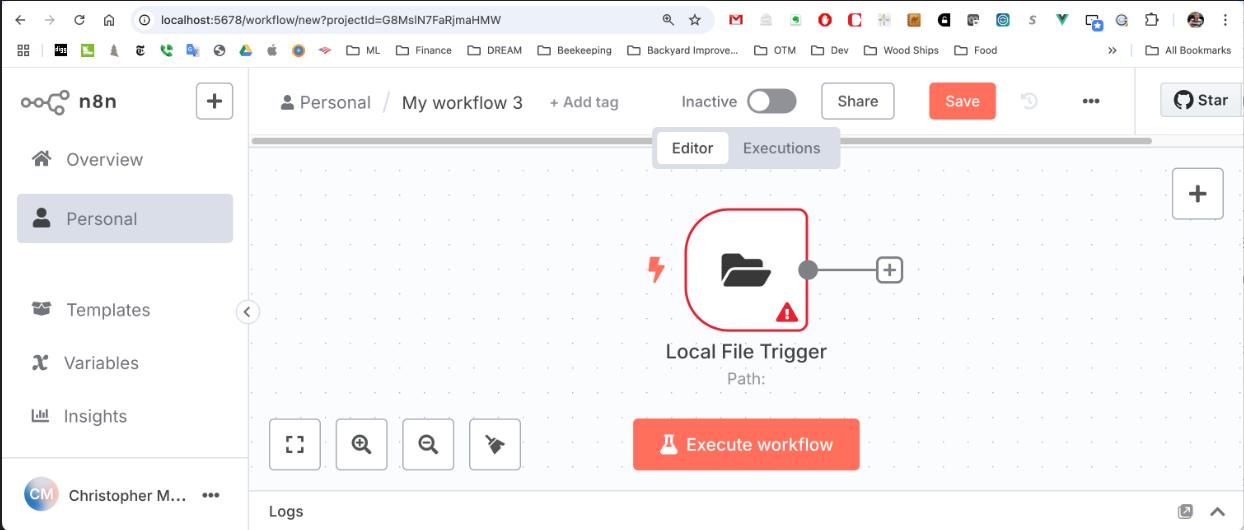
Double click on the "Local FIle Trigger" node and in the text box labeled "Folder to Watch" type in "watch" (assuming this is what you called your watch folder). Next, select "File Added" in the "Watch for" selection box. Click on "Back to canvas" in the upper left corner or hit ESC to return to the workflow view.
This node is now configured to watch for new files added to the "watch" folder and will pass information about the dropped file to the next node in the workflow, which we'll add next.
To verify that this node is working as expected, click on red "Execute Workflow" button (the node should now show rotating arrows indicating it is waiting for a file) and then move Theresa document into the "watch" folder.
The rotating arrows should disappear once the file addition is detected. Now double click again on the "Local File Trigger Node" and you should see the information that the node is outputting to the next workflow node:
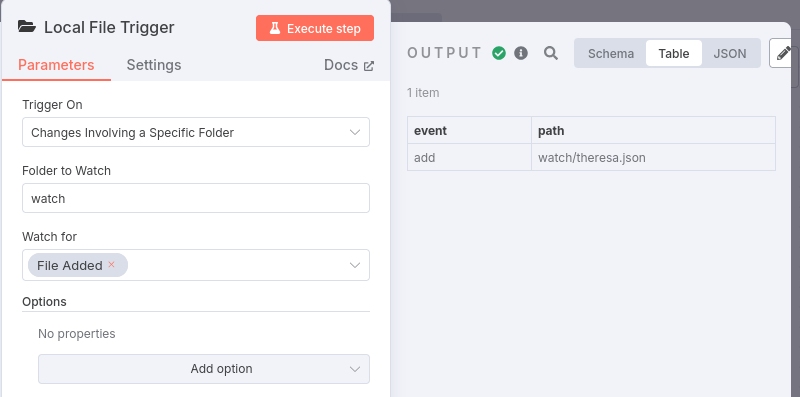
The output is a json object with a "event" property defining the type of the event (e.g., add, change, delete) and a "path" property that specifies the path to the added file relative to the location from which n8n is running.
Read File from Disk Node
To add the next node, click on the + at the end of the line emanating form the "Local File Trigger" node. In the "What happens next" search box enter "Read Files" and click on "Read/Write Files from Disk". The workflow should now appear as:
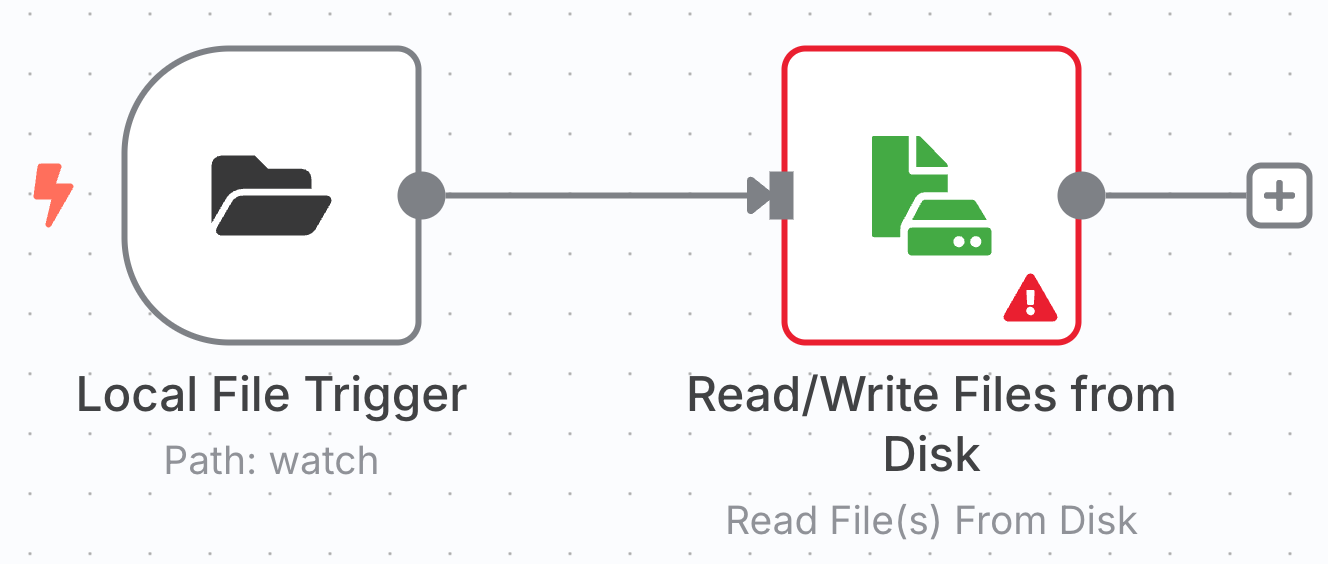
Next, double click on "Read/Write File(s) from Disk" node; you should see something like:
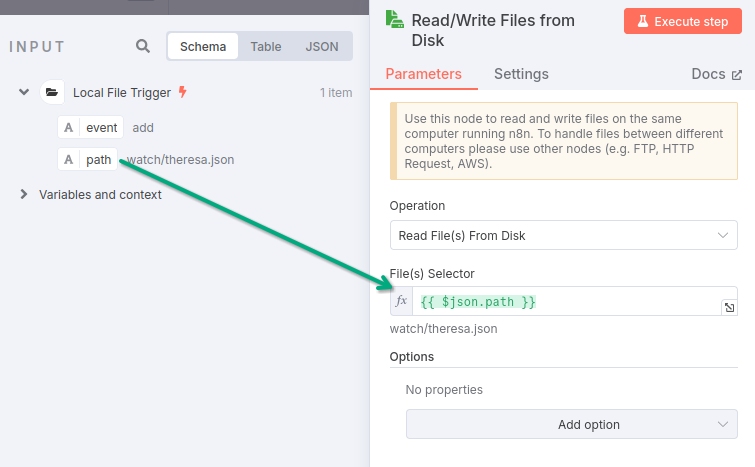
Now you can drag the "path" property from the Input pane into the "File(s) Selector" text box in the "Read/Write Files from Disk" pane, telling the node to read the file located at the specified path into the node.
You'll see that the value entered into the text box is {{ $json.path }}. The double curly brackets indicate that its contents should be interpreted as an expression rather than mere text. The "$json" reference in the brackets refers to the json object that the previous node passed into the current node and the ".path" references the "path" property on that object.
To verify the node's configuration, click on the red "Execute step" button and you should see:
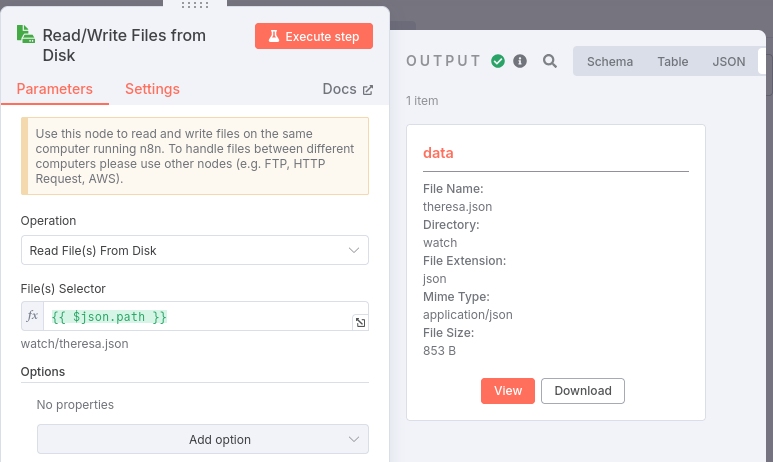
The Output pane displays information about the file that was just read into the node and that will be passed on to the next workflow node.
Extract Content From File Node
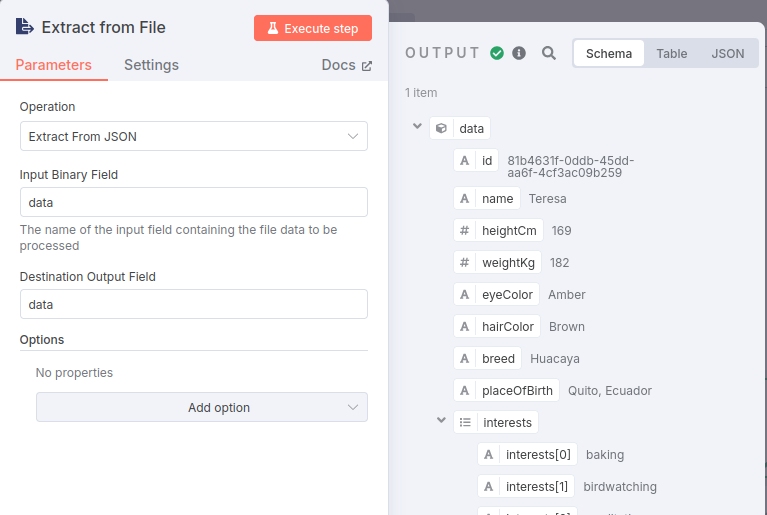
Now that we have the binary file object we need to extract its contents, so go ahead and add a new "Extract from File" node to the end of the workflow. When prompted for the Action to use select "Extract from JSON".
When you select this node, a list of "Actions" will appear and since we're ingesting a json file select "Extract from JSON".
This node should appear as:
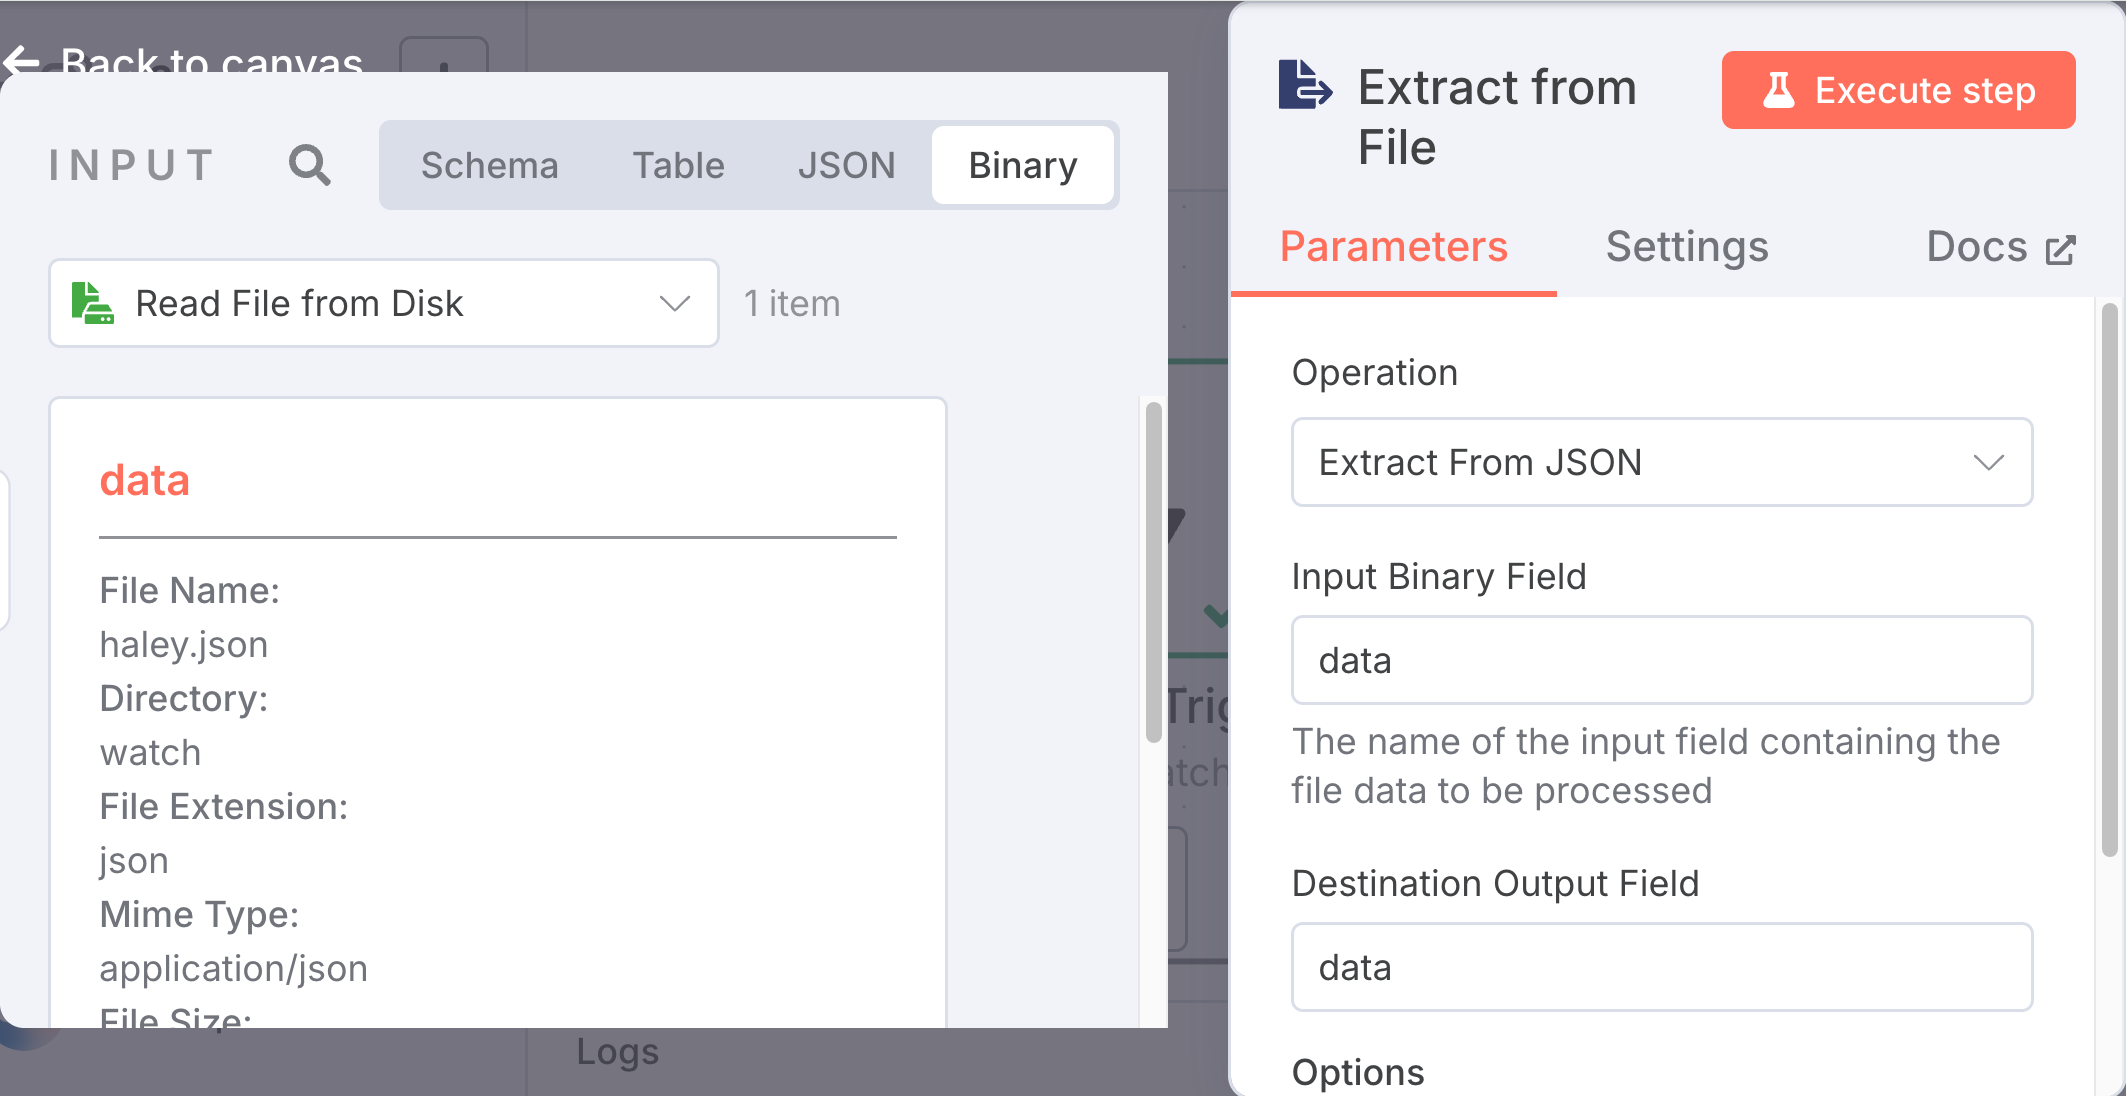
The abstract data object in the Input pane should already be referred to in the "Destination Output Field" of the "Extract from File" pane.
To verify things are properly wired, click on the red "Execute step" button and you should see:
PUT Doc to MarkLogic Node
Next, you'll need to add an "HTTP Request" node that will send the extracted json document to MarkLogic.
Configure this node by specifying the HTTP method as "PUT" and the endpoint "URL" as http://localhost:8003/LATEST/documents?uri=/clevellamas/sample/n8n/{{ $('Read/Write Files from Disk').item.json.fileName }}
For the "Authentication" field you'll need to specify "Generic Credential Type" and then set the the "Generic Auth Type" to "Basic" or "Digest", depending upon what your MarkLogic http service is set to (most likely Digest).
Finally you'll need to create an n8n "Credential" to put into the "Digest Auth" selection box. Assuming your MarkLogic 8000 HTTP server is set to Digest, click on the "Digest Auth" pull-down menu and select "Create new credential". Enter your MarkLogic admin credentials into the "User" and "Password" fields and click on the red "Save" button. To name this Credential click on the title of the node (it should say something like "Unnamed credential") and enter a name, hit Enter and then click on the "Save" button.
Next we need to specify that we want to send the json in the body of the HTTP request, so turn on the "Send Body" option. The "Body Content Type" should be set to Raw and the "Content Type" should be application/json. Set the "Body" to {{json.data}} by either dragging the ```data`` object from the left hand pane (make sure "Schema" at the top right of the pane) into the "Body" text box in "PUT Doc to MarkLogic" node, or, you can manually type {{json.data}} into the text box and click on "Expression" (the "Fixed" vs "Expression" options will appear if your cursor is over the "Body" section).
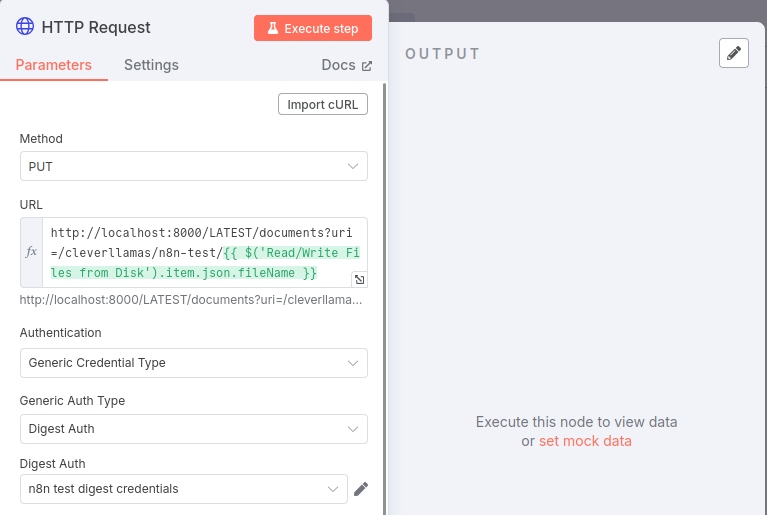
To verify the setup, click on the red "Execute step" button and you should see an output pane that says: "No fields - node executed, but no items were sent on this branch". This is expected and indicates the MarkLogic request was executed.
If you go into the MarkLogic qconsole (http://localhost:8000) and Explore in the Documents database you should see a document at /Theresa.json.
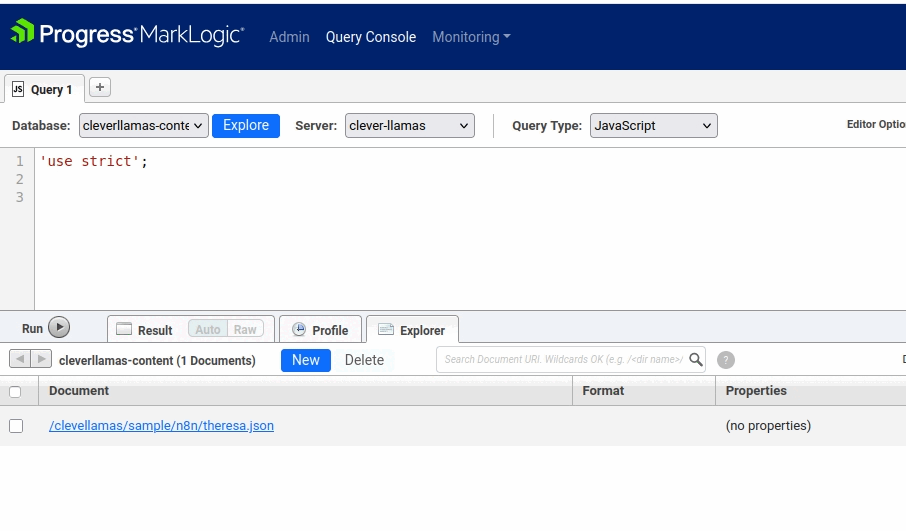
Let's remove that document in preparation for our End-to-End Workflow Test: click on the box to the left of /Theresa.json and then click on the "Delete" button and select "OK" from the popup window.
End-to-End Workflow Test
In the n8n UI, your workflow should look like this:

Click on the red "Execute Workflow" or click on the red lightning bolt icon at the front of the workflow.
Remove the Theresa.json file from the "watch" folder; either move it to some other folder or cut it using CTRL-X or CMD-X. Now move it back into the "watch" folder.
If you quickly return to the n8n UI you should see the rotating arrows move from the first node to each of the subsequent workflow nodes as the data moves through the pipeline.
When the workflow completes there should be a green check on each of the nodes. And, if you go back to query console you should see the /Theresa.json document is back.
What's Coming Next...
In the next blog in this series we'll augment our ingestion pipeline to include support for ingesting the text content of PDF files. We'll then create a new workflow for querying MarkLogic using cts.wordQuery - a capability we wil need to support a basic RAG workflow.
- Core Technologies
- n8n
- MarkLogic
- LLMs
- RAG
- Vector Search
- Semaphore
- Getting Started: n8n and MarkLogic
- Setting Up and Running n8n
- Running n8n
- Setting Up MarkLogic
- Creating an Ingestion Workflow
- The Data
- Creating the Workflow
- PUT Doc to MarkLogic Node
- What's Coming Next...
